Xmas Tree
In this post I will be going over a step by step tying instruction of the Xmas Tree pattern. This fly is primarily tied for coho salmon however I have also caught pinks, chum, chinook, and cutthroat on these. This fly is an effective stripped fly however I have fished this swung and picked up many fish that way as well.
Here is a shot of 3 versions I tie. The first creations were tied with only silver beads. Since then I have done them with silver, gold, black and hot orange beads to great effectiveness. Top to bottom - blue/green, silver/pale blue, silver.

Here is a list of materials including pictures to give you a visual reference
Hook - any short shank heavy gauge will work. straight eyed hook is preferred. (Mustad C68SZ)
Bead - appropriate sized to the waters you will be fishing (5/32" pictured here, color Hot Orange)
Threads - Hot Orange for behind the bead. any colour thinner thread for under the bead.
If your orange is thin enough you can skip using a second thread.
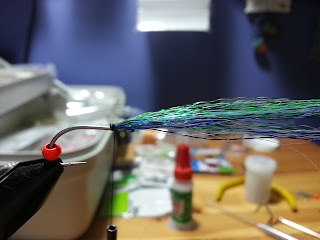
Body material - Crystal Flash, here I am using blue/green


Place the hook in the vise and run the bead to the bend of the hook. Anchor your thinner thread (black here) by the eye of the hook using only a few wraps. Now take the Crystal Flash and double it around the thread and tie it down facing towards the eye of the hook, make sure it all stays on the top of the hook. Use 2-3 wraps to tie it down and then whip finish and cut the thread off. You can add a little head cement on the thread if you want for added strength.
next push the bead up and over the crystal flash. tie in your hot orange thread behind the bead and build it up about 1/8-3/16" wide and just thick enough to hold the bead tightly in place. Now pull the crystal flash tightly over the bead, if it spreads down the sides of the bead a little its no biggie. While holding it tie it down behind the bead.
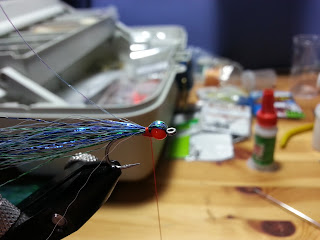
make several wraps to hold everything tightly. Here is where I will toss in a whip finish, then take a few more wraps and the final whip finish. Whenever I can on salmon/steelhead flies I like to use 2 or even 3 whip finishes with a few wraps in between, this is for strength so if it gets frayed it will only untangle to the next whip finish allowing you to keep fishing that fly.
Don't forget to add head cement on the thread and the material over top the bead, this is pretty crucial to keep the material and thread from fraying due to fish teeth.

Now here you have two options:
leave the fly long and trim it on the water (shown above) OR you can trim it at the vice. Here is a trimmed one and a pic showing how small this fly really is next to a thread spool.


I hope you have a lot of success with this pattern. You can add subtleties or change the colour completely for your local waters, be creative. I have been thinking a couple strands of red flash may even set off this pattern further.
Happy Tying
James
No comments:
Post a Comment